Hoewel Figma voornamelijk door ontwerpers wordt gebruikt, hebben wij geprobeerd het te integreren in het ontwikkelingsproces door Figma om te zetten in een CMS.
Het beheren van grafische middelen in een groot project kan tijdrovend en kostbaar zijn, wat veel opslagruimte en tijd vergt. Het webgebaseerde ontwerptool Figma biedt een geweldige oplossing, mits we hun API op een slimme manier gebruiken.
Vorig jaar zag softwareontwerpbedrijf Figma zijn waardering vervijfvoudigen (!) tot $10 miljard. Hoewel dit hulpmiddel voornamelijk door ontwerpers wordt gebruikt, hebben wij geprobeerd Figma te gebruiken in het ontwikkelingsproces van onze oplossingen. Wij hebben Figma gebruikt als een visueel CMS voor onze eigen applicaties. Hieronder vind je een gids over hoe je dit kunt doen.
Voordat we dieper ingaan op de technische details, laten we beginnen met het interpreteren van de explosieve waardestijging van Figma. Waarom zou je het gebruiken?
- Naarmate Figma groeit in de industrie, is het het ontwerptool die we het vaakst zien bij het ontvangen van visueel en/of interactieontwerp en in termen van iconenbibliotheekbeheer.
- Omdat het gratis is en snel te gebruiken, omdat het cloudgebaseerd is en beschikbaar vanaf elk apparaat of locatie.
- Figma heeft een uitgebreide API die alles dekt, van CRUD-acties op bestanden tot webhooks om op de hoogte te worden gesteld van bijgewerkte bestanden.
- Figma vergemakkelijkt de overdracht van ontwerper naar ontwikkelaar.
Hoe willen wij Figma gebruiken?
Hoe gaan we van Figma als ontwerptool naar een CMS?
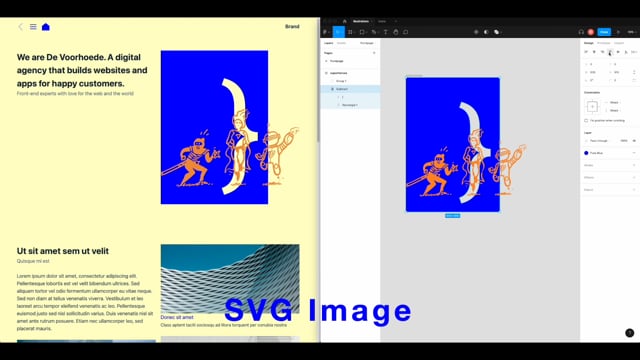
Laten we stap voor stap door de gebeurtenissen in de video lopen:
- Een Figma-object wordt bewerkt door vormen te verplaatsen en opnieuw te kleuren;
- Een nieuwe bestandversie wordt vrijgegeven. De webhook-trigger wordt ingesteld op 'bestandsversie-update', zodat werk in uitvoering niet wordt gepubliceerd. Zie dit als de "publiceer" knop in je CMS.
- Wacht totdat de server een verzoek van de webhook ontvangt en een build-script uitvoert; en
- Zie de wijzigingen in de browser.
Waarom het werkt
De Figma HTTP API heeft een export-eindpunt dat tijdelijk een geëxporteerde bron opslaat in hun cloudopslag (een AWS S3-bucket op het moment van schrijven). We kunnen deze tijdelijke opslag gebruiken tijdens ons buildproces om nieuwe grafische middelen bij elke build op te halen en op te slaan in de build-cache, of zelfs een bronnen-cache van cloudopslaglinks beheren die periodiek worden bijgewerkt. Door de nieuwe webhooks van Figma kunnen we deze builds zelfs op bepaalde gebeurtenissen activeren, en het 'FILE_VERSION_UPDATE'-evenement is perfect hiervoor. Het wordt geactiveerd elke keer dat een nieuwe 'versie' wordt vrijgegeven, waardoor je volledige controle hebt over wat en wanneer wordt bijgewerkt.
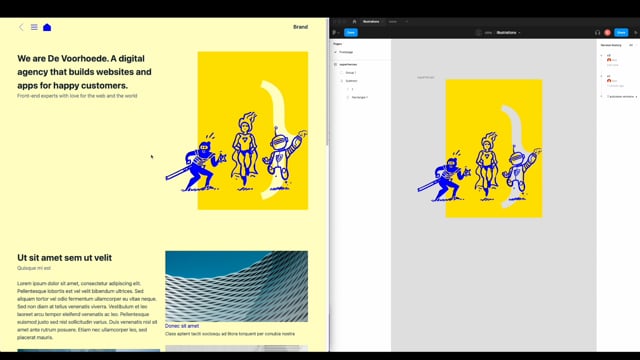
We hadden dit in gedachten voor een project dat veel verschillende visuele componenten vereiste, beheerd door verschillende mensen op verschillende locaties. En het werkte perfect met Figma en zijn API. Het voorbeeld is vrij eenvoudig, met een enkele illustratie, maar stel je bijvoorbeeld het beheren van kaarten van binnenruimtes voor.
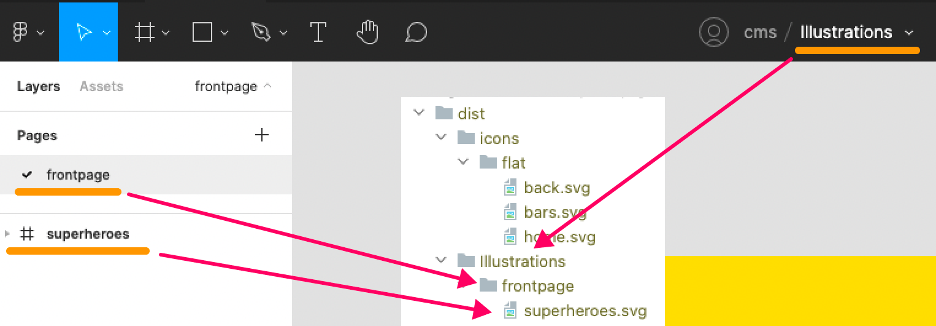
In deze opzet worden Figma-bestanden tijdens de build gemapt naar een statische map, volgens de naamgeving die in Figma wordt gebruikt.
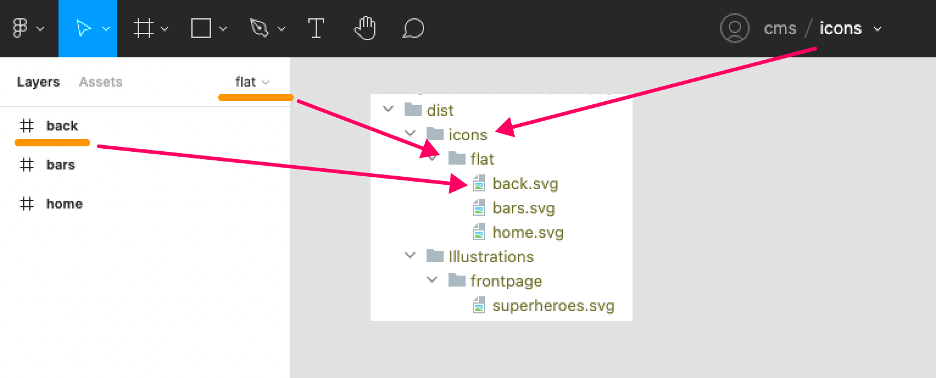
We kunnen deze SVG's gebruiken om een iconen-spritesheet voor onze applicatie te bouwen, wat er ongeveer zo uit zou kunnen zien:
Gebruik van de API
Voor de eerder genoemde voorbeelden heb ik een functie gebouwd die SVG's exporteert op basis van zogenaamde filekey's die Figma gebruikt. Het aanroepen van hun/files eindpunt als volgt:
Let op, er is geen bestandversie in dit verzoek gespecificeerd. De nieuwste bestandversies moeten op je serverimplementatie worden beheerd om ervoor te zorgen dat build-triggers anders dan Figma de versie-uitgaveflow van de grafische middelen niet onderbreken.
function getResourcesByFileKey(fileKey, fileName = 'icons') {
    return fetch(`${FIGMA_BASE}/v1/files/${fileKey}?depth=2`, {
        headers: {
            'x-figma-token': X_FIGMA_TOKEN
        }
    }) // Fetches the file object by the fileKey
        .then(res => res.json())
        .then(res => res.document.children.map((child, i) => ({ // Create an array of the top-level frames
            page: child.name,
            nodes: child.children.map(child => ({
                name: child.name,
                id: child.id
            })),
            ...child
        })))
        .then(items => items.map(({page, nodes}) => [ // Use the node ID's of these frames to export them
            fsPromises.mkdir( // First ensure the folder to save it to
                path.resolve(
                    __dirname,
                    `../dist/${fileName}/${page}`),
                {recursive: true}
            ),
            nodes.map(
                node =>
                    fetch(`${FIGMA_BASE}/v1/images/${fileKey}?ids=${node.id}&format=svg&svg_include_id=true`,
                        {
                            headers: {
                                'x-figma-token': X_FIGMA_TOKEN
                            }
                        }) // Fetch every node
                        .then(res => res.json())
                        .then(res => res.images[node.id])
                        .then(async (resource) => {
                            console.log(`🦴Fetching '/${fileName}/${page}/${node.name}.svg'`)
                            return await fetch(resource).then(res => res.text())
                        })
                        .then(data => // Return a promise for the file writes
                            fsPromises.writeFile(
                                path.resolve(
                                    __dirname,
                                    `../dist/${fileName}/${page}/${node.name}.svg`),
                                data.replace(/fill=".*?"/, ''),
                                err => {
                                    if (err) {
                                        console.error(err)
                                    }
                                })
                        )
            )]))
}
We eindigen met een array die de pagina's en hun top-level nodes bevat voor het bestand dat we hebben opgegeven. De naam van de top-level node, meestal een frame in Figma, zal de bestandsnaam zijn. Superheroes.svg in ons voorbeeld. We kunnen vervolgens door de array lopen en SVG-resources ophalen van hun /imagesendpoint en deze opslaan op ons bestandssysteem.
Met behulp van het /projects endpoint kunnen we alle bestanden binnen een project opvragen (bijvoorbeeld een project genaamd “CMS”) en vervolgens getResourceByFileKey() aanroepen voor elk bestand dat we in ons project vinden.
async function getResourcesFromFigma() {
        const figmaFiles = await fetch(`${FIGMA_BASE}/v1/projects/${FIGMA_PROJECT}/files`, {
            headers: {
                'x-figma-token': X_FIGMA_TOKEN
            }
        })
            .then(res => res.json())
            .then(json => json.files)
        await Promise.all(figmaFiles.map(({key, name}) => module.exports.getResourcesByFileKey(key, name)).flat())
    }
Om alle gebeurtenissen met elkaar te verbinden, gebruiken we de nieuwe webhooks van Figma. We registreren een nieuwe webhook bij het opstarten van de server:
fetch(`${FIGMA_BASE}/v2/webhooks?team_id=${FIGMA_TEAM}&endpoint=${ENDPOINT}/figma/file_update&passcode=${passcode}&event_type=FILE_VERSION_UPDATE`)Figma zal nu POST'en naar het endpoint dat je hebt opgegeven in het verzoek met de bijbehorende fileKey voor de bijgewerkte bestandversie. We kunnen vervolgens de eerder genoemde functie opnieuw aanroepen met de geleverde fileKey (ik gebruik een eenvoudige Fastify node-server in dit voorbeeld):
fastify.post('/file_update', async (request, reply) => {
    if (request.body.passcode === passcode) {
        reply.code(200)
        const {file_name, file_key, timestamp} = request.body
        console.log(file_name, file_key, timestamp)
        if(file_name && file_key && timestamp) {
            await getResourcesByFileKey(file_key, file_name)
        }
    } else reply.code(403)
    reply.send()
})
Let op dat ik geen foutafhandeling heb uitgevoerd; deze code is lang als voorbeeld. Overweeg je eigen implementatie!
Gerelateerde blog posts
Headless CMS'en gaan de strijd aan: Strapi vs DatoCMS
Door Remco
Dropbox Paper als een headless CMS
Door Jasper
- Door Jasper