A guide to publishing your Vue components
When working on multiple projects with Vue.js as your framework of choice, you often find yourself writing the same components over and over again. Is there a better way?
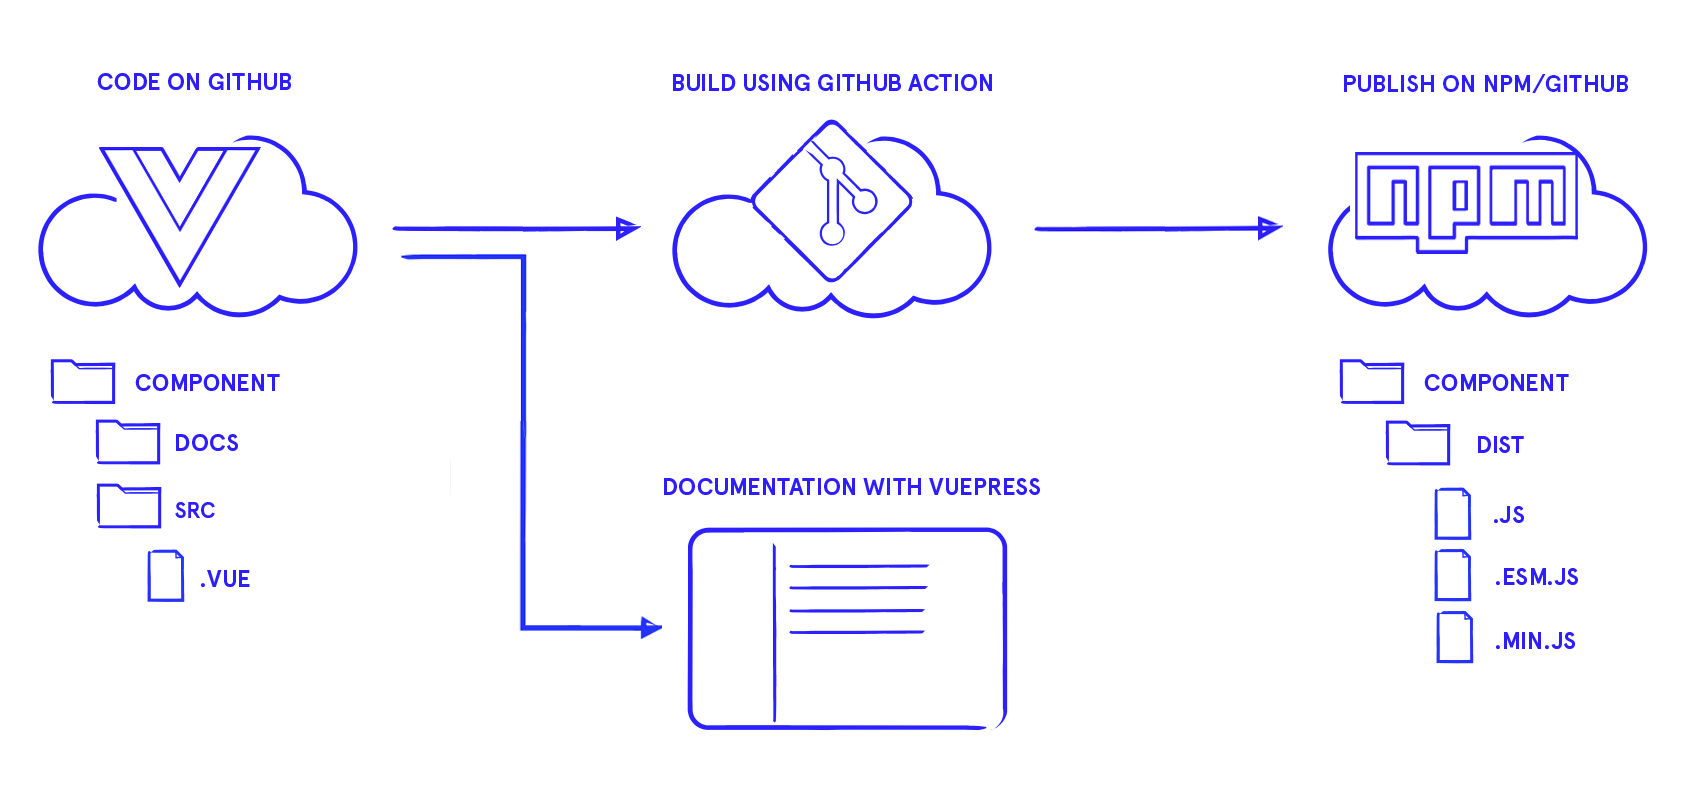
A way to solve this is to separate them from your projects and publish them to npm. This way you can make your components reusable, open source and available across teams. Here’s how we automated our process to bundle, test, document and publish Vue components.
Do you want to become a Vue master? During our two day hands-on workshop we’ll teach you everything you need to know to build large performant web apps with Vue.
Bundling a Vue component
One way to share your component is by directly publishing the .vue file to npm. This will work in cases where you can import .vue files in your project, but what if someone wanted to use it directly in the browser? That will not work. To prepare for these types of situations you should bundle them into .js files.
As a base for the project we’ll need a package.json file (run npm init to create one) and a src folder. The structure of it will roughly look like this:
src/
  index.js
  your-vue-component.vue
  your-vue-component.test.js
package.json
rollup.config.js
For unit testing we’re using vue-test-utils, the official test library for Vue components, combined with Jest. Tests are located in .test.js files and are used to make sure components work the way they are supposed to work. It improves maintainability, since it will indicate if you broke something when making changes to your code.
A commonly used tool for bundling Vue components is Rollup, a JavaScript module bundler. It compiles the Vue components into different formats to use in ES, common JS or directly in the browser. The base configuration for Rollup in this situation looks like this:
// import necessary dependencies
import vue from 'rollup-plugin-vue'
import buble from 'rollup-plugin-buble'
import commonjs from 'rollup-plugin-commonjs'

export default {
  input: 'src/index.js', // entry file for our components
  plugins: {
    preVue: [
      replace({
        'process.env.NODE_ENV': JSON.stringify('production'),
      }),
      commonjs(), // add support for CommonJS modules
    ],
    vue: {
      css: true, // include CSS in the output
      template: {
        isProduction: true,
      },
    },
    postVue: [
      buble(), // use buble to transpile ES2015
    ],
  },
}
This base configuration can now be extended for the module types we want to export. For a full example, see the rollup.config.js of our vue-lazy-load component.
In our package.json we can specify where we want our transpiled bundles to end up:
{
  "name": "your-component-name",
  "main": "dist/your-component-name.ssr.js",
  "module": "dist/your-component-name.esm.js",
  "unpkg": "dist/your-component-name.min.js",
  "style": "dist/your-component-name.css",
  // ...
}
All the different fields serve their purpose:
- Modern bundlers will use the
modulebuild - Legacy bundlers and Node.js will use the
mainbuild - The
unpkgbundle can be used directly in the browser via UNPKG
You’ll also notice a style property. Typically, you’ll want to separate your styles from the JS bundle. This gives freedom for users to apply their styles or use their loaders/plugins of choice to process them.
This is an example of how you would import the component and styles in your application:
import YourComponentName from 'your-component-name'
import 'your-component-name/dist/your-component-name.css'
Adding documentation with VuePress
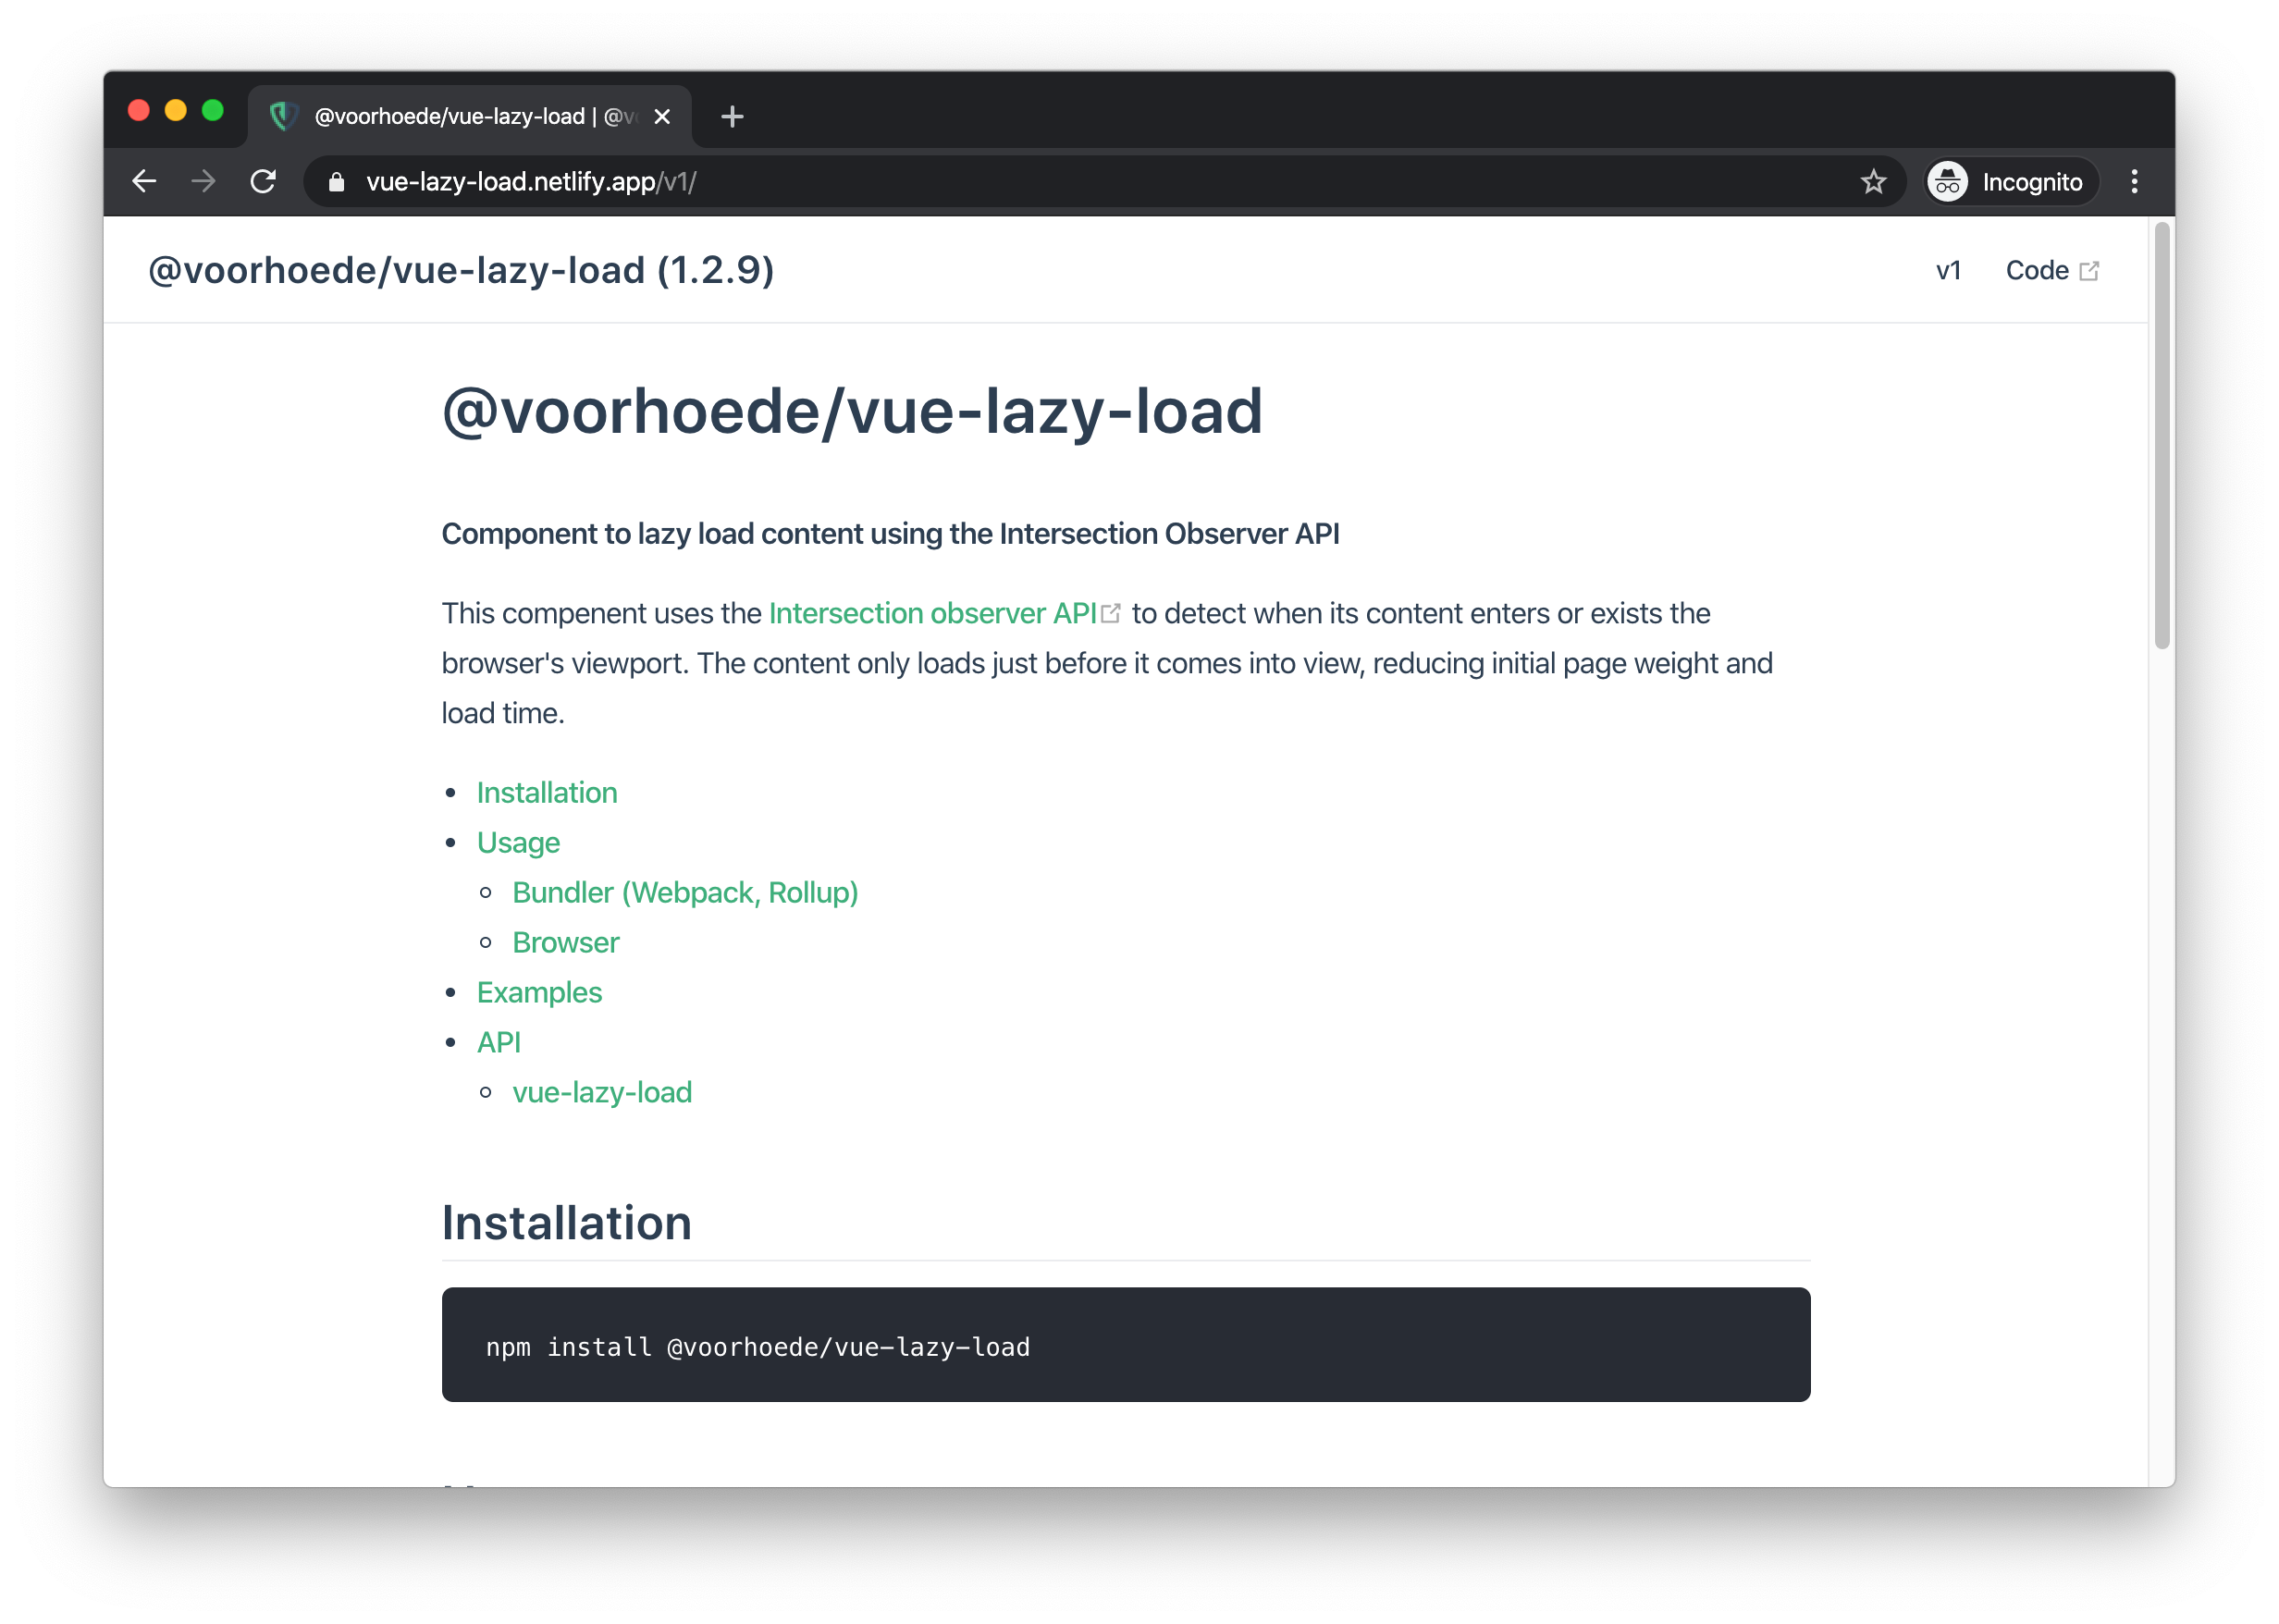
Writing your documentation in your readme.md is a convenient way to document components. But what if you want to create an interactive demo or add a nice theme to it? Markdown processing tools like VuePress or Docz are a perfect option for that. These tools convert markdown files into a static site to host as your documentation. In our case, we’re using VuePress, since it suits the Vue ecosystem.
To create our documentation we need a folder to build it from. The structure for this folder should look something like this:
docs/
  readme.md
  .vuepress/
    config.js
The readme.md file is used for generating the HTML. There are plugins available for VuePress to extend its functionality. In our case we’re using plugin-register-components combined with vuepress-plugin-demo-code to be able to demonstrate our components:
const pkg = require('../../package.json')

module.exports = {
  title: `${pkg.name} (${pkg.version})`,
  description: pkg.description,
  dest: `www`,
  plugins: [
    ['@vuepress/register-components', {
        componentsDir: `${__dirname}/../../src/`
    }],
    'demo-code'
  ]
}
Documenting Vue props, events and slots
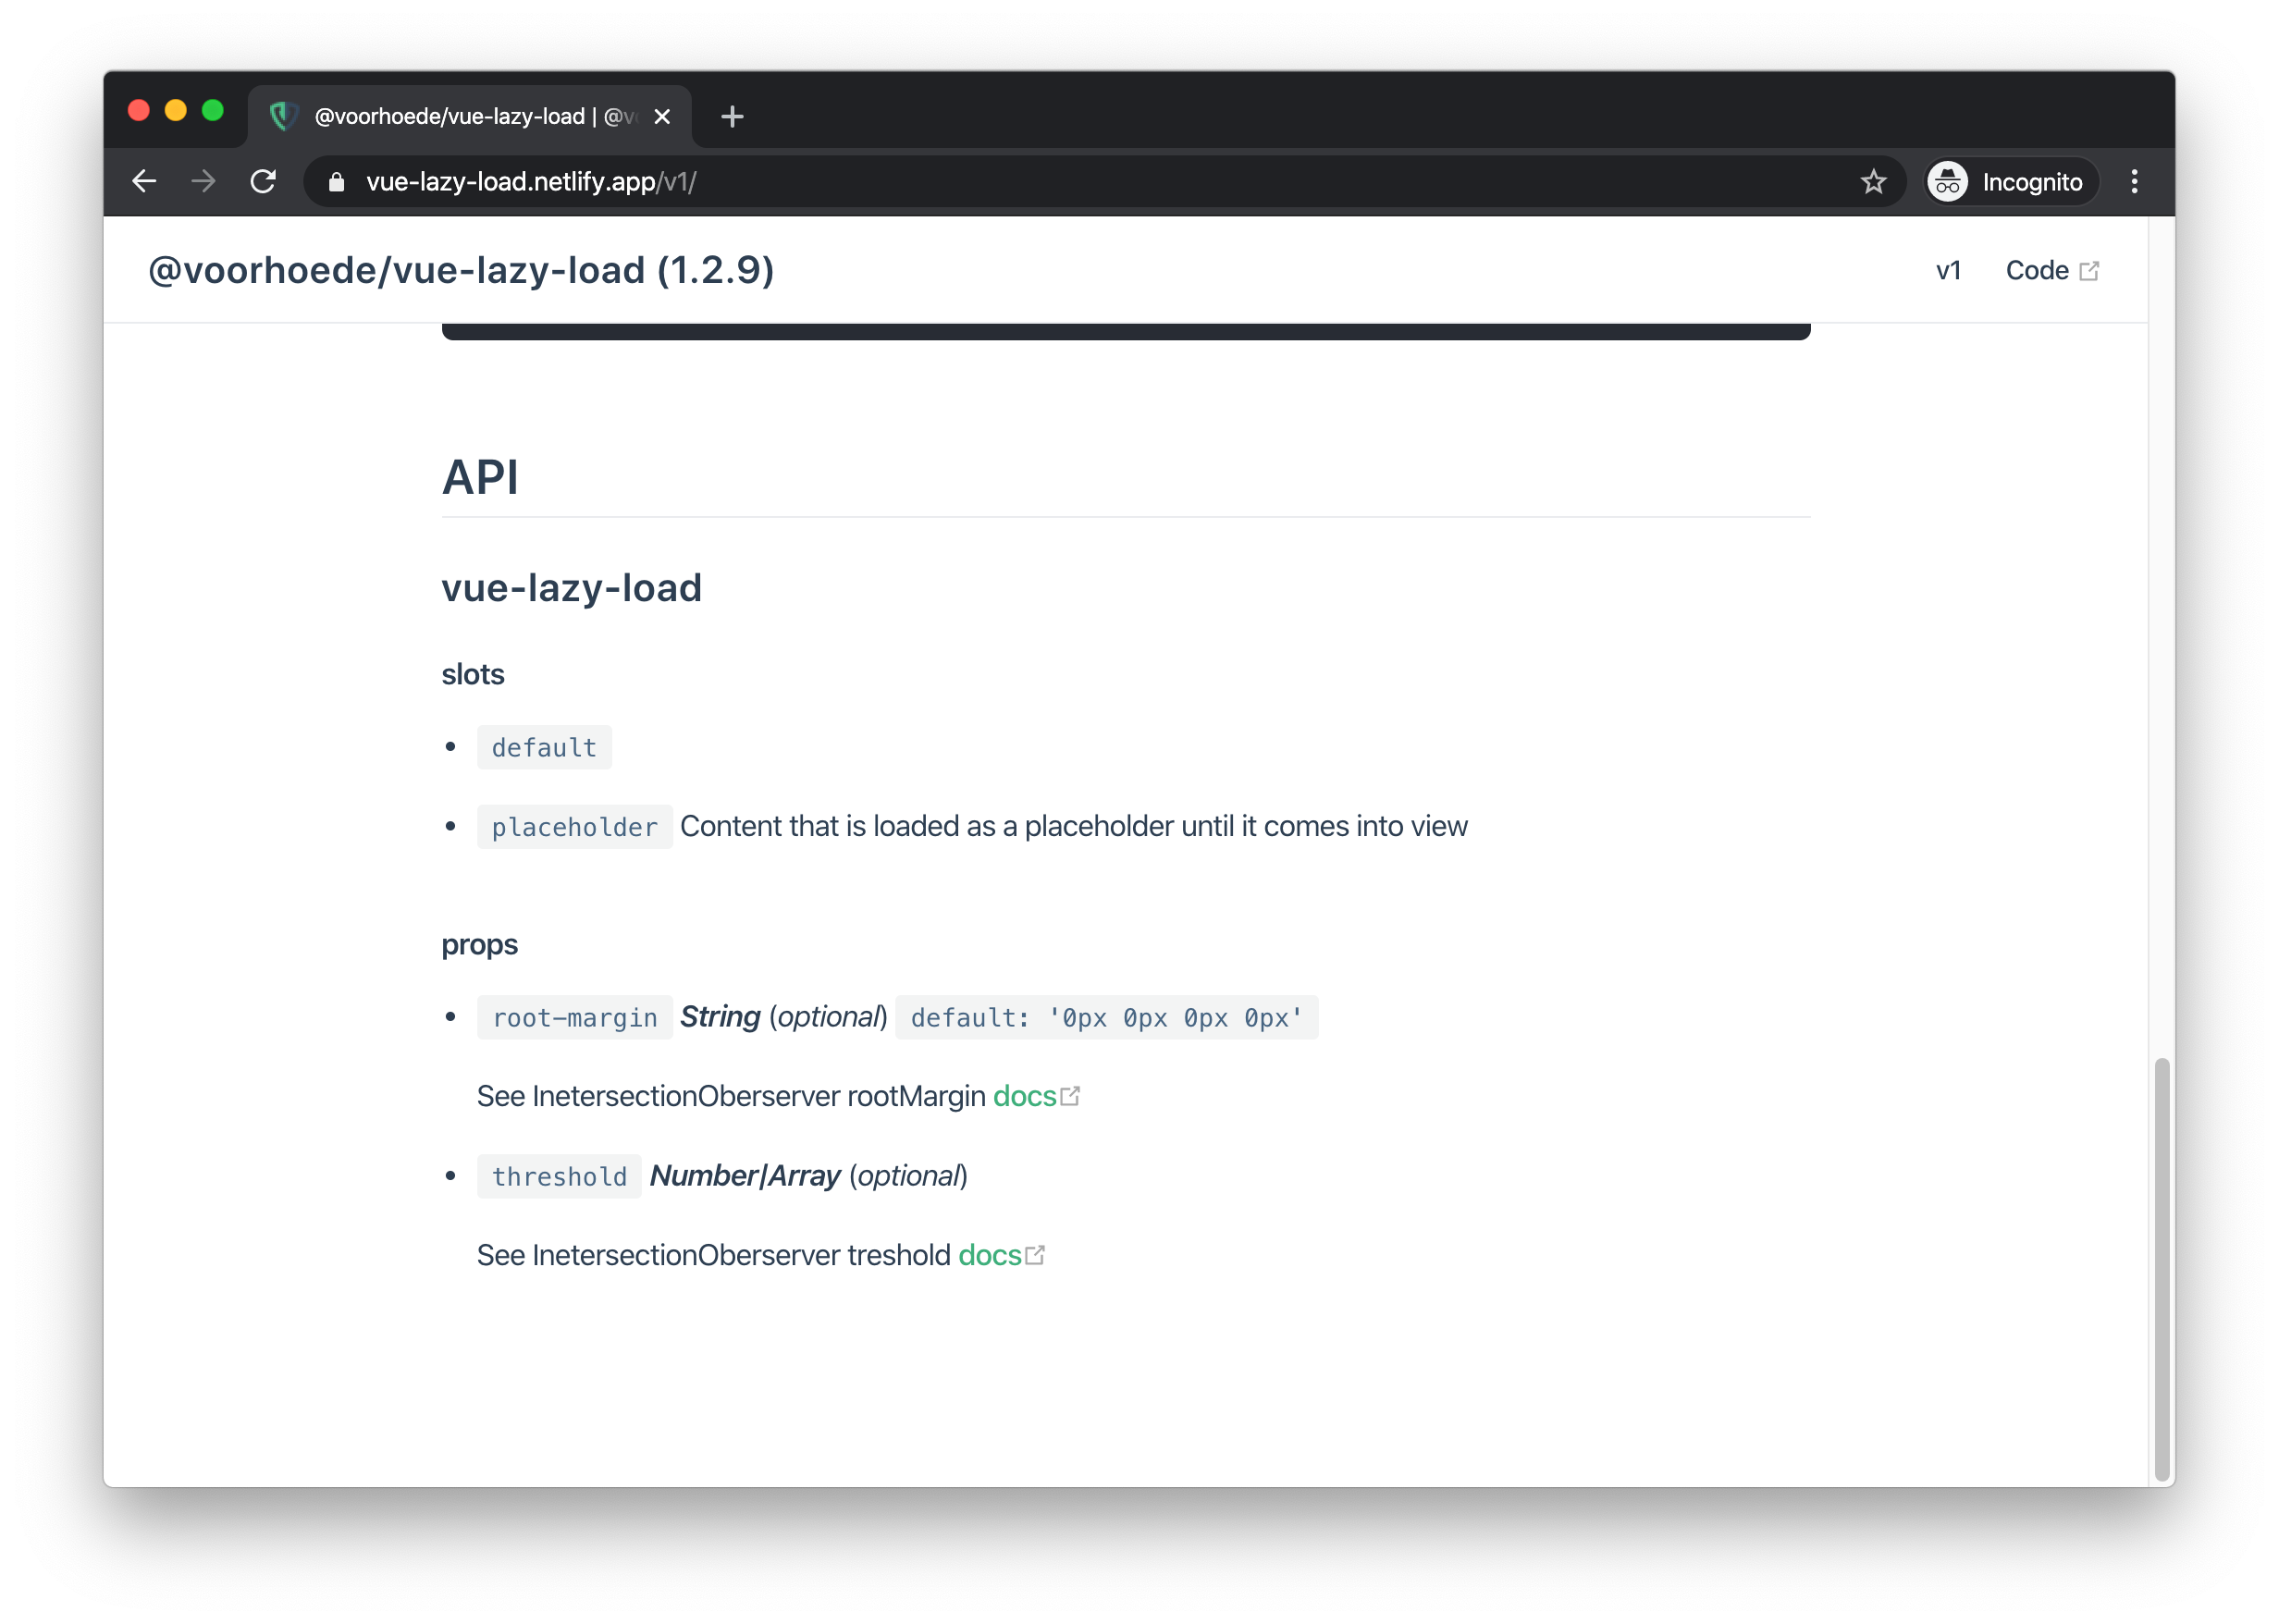
To give the user information about our component, we should document props, events and slots. Documenting those is not fun to do by hand and seems like something we can automate. A tool named @vuedoc/md can do just this. It scans through the Vue component looking for props, slots, and events. It converts these into a markdown structure and will append it to a specified markdown file.
Below are the scripts to generate our documentation. First, we extract the props, events, and slots and append to our markdown file. After that, we generate our static site using VuePress.
"scripts": {
  // ...
  "docs": "run-s docs:*",
  "docs:api": "vuedoc.md src/your-component-name.vue --section 'API' --output docs/v1/readme.md --ignore-data --ignore-methods --ignore-computed",
  "docs:vuepress": "vuepress build docs",
  // ...
},
The generated static site can now be hosted wherever you want, for example on Netlify or GitHub pages.
Publishing to npm
The bundles created by Rollup are ready to be published to npm. After creating a build, use npm publish.
To make things easier, we can automate this by using a GitHub action. This will automatically create a new version of your npm package when a new tag is pushed. We do this by adding a .github/workflows/npm.yml file:
on:
  push:
    tags: v*.*.*
jobs:
  npm:
    runs-on: ubuntu-latest
    steps:
    - uses: actions/checkout@master
    - uses: actions/setup-node@v1
      with:
        node-version: '10.x'
        registry-url: 'https://registry.npmjs.org'
    - name: Build package
      run: npm run build
    - name: Publish tag to npm
      if: contains(github.ref, 'tags')
      run: npm publish
      env:
        NODE_AUTH_TOKEN: ${{ secrets.NPM_AUTH_TOKEN }}
Here’s the complete workflow for one of our Vue components.
Bonus: publish to GitHub
It’s also possible to publish your package to GitHub packages registry
- uses: actions/setup-node@v1
  with:
    registry-url: 'https://npm.pkg.github.com'

- name: Publish tag to GPR
  run: npm publish
  env:
    NODE_AUTH_TOKEN: ${{ secrets.GITHUB_AUTH_TOKEN }}k
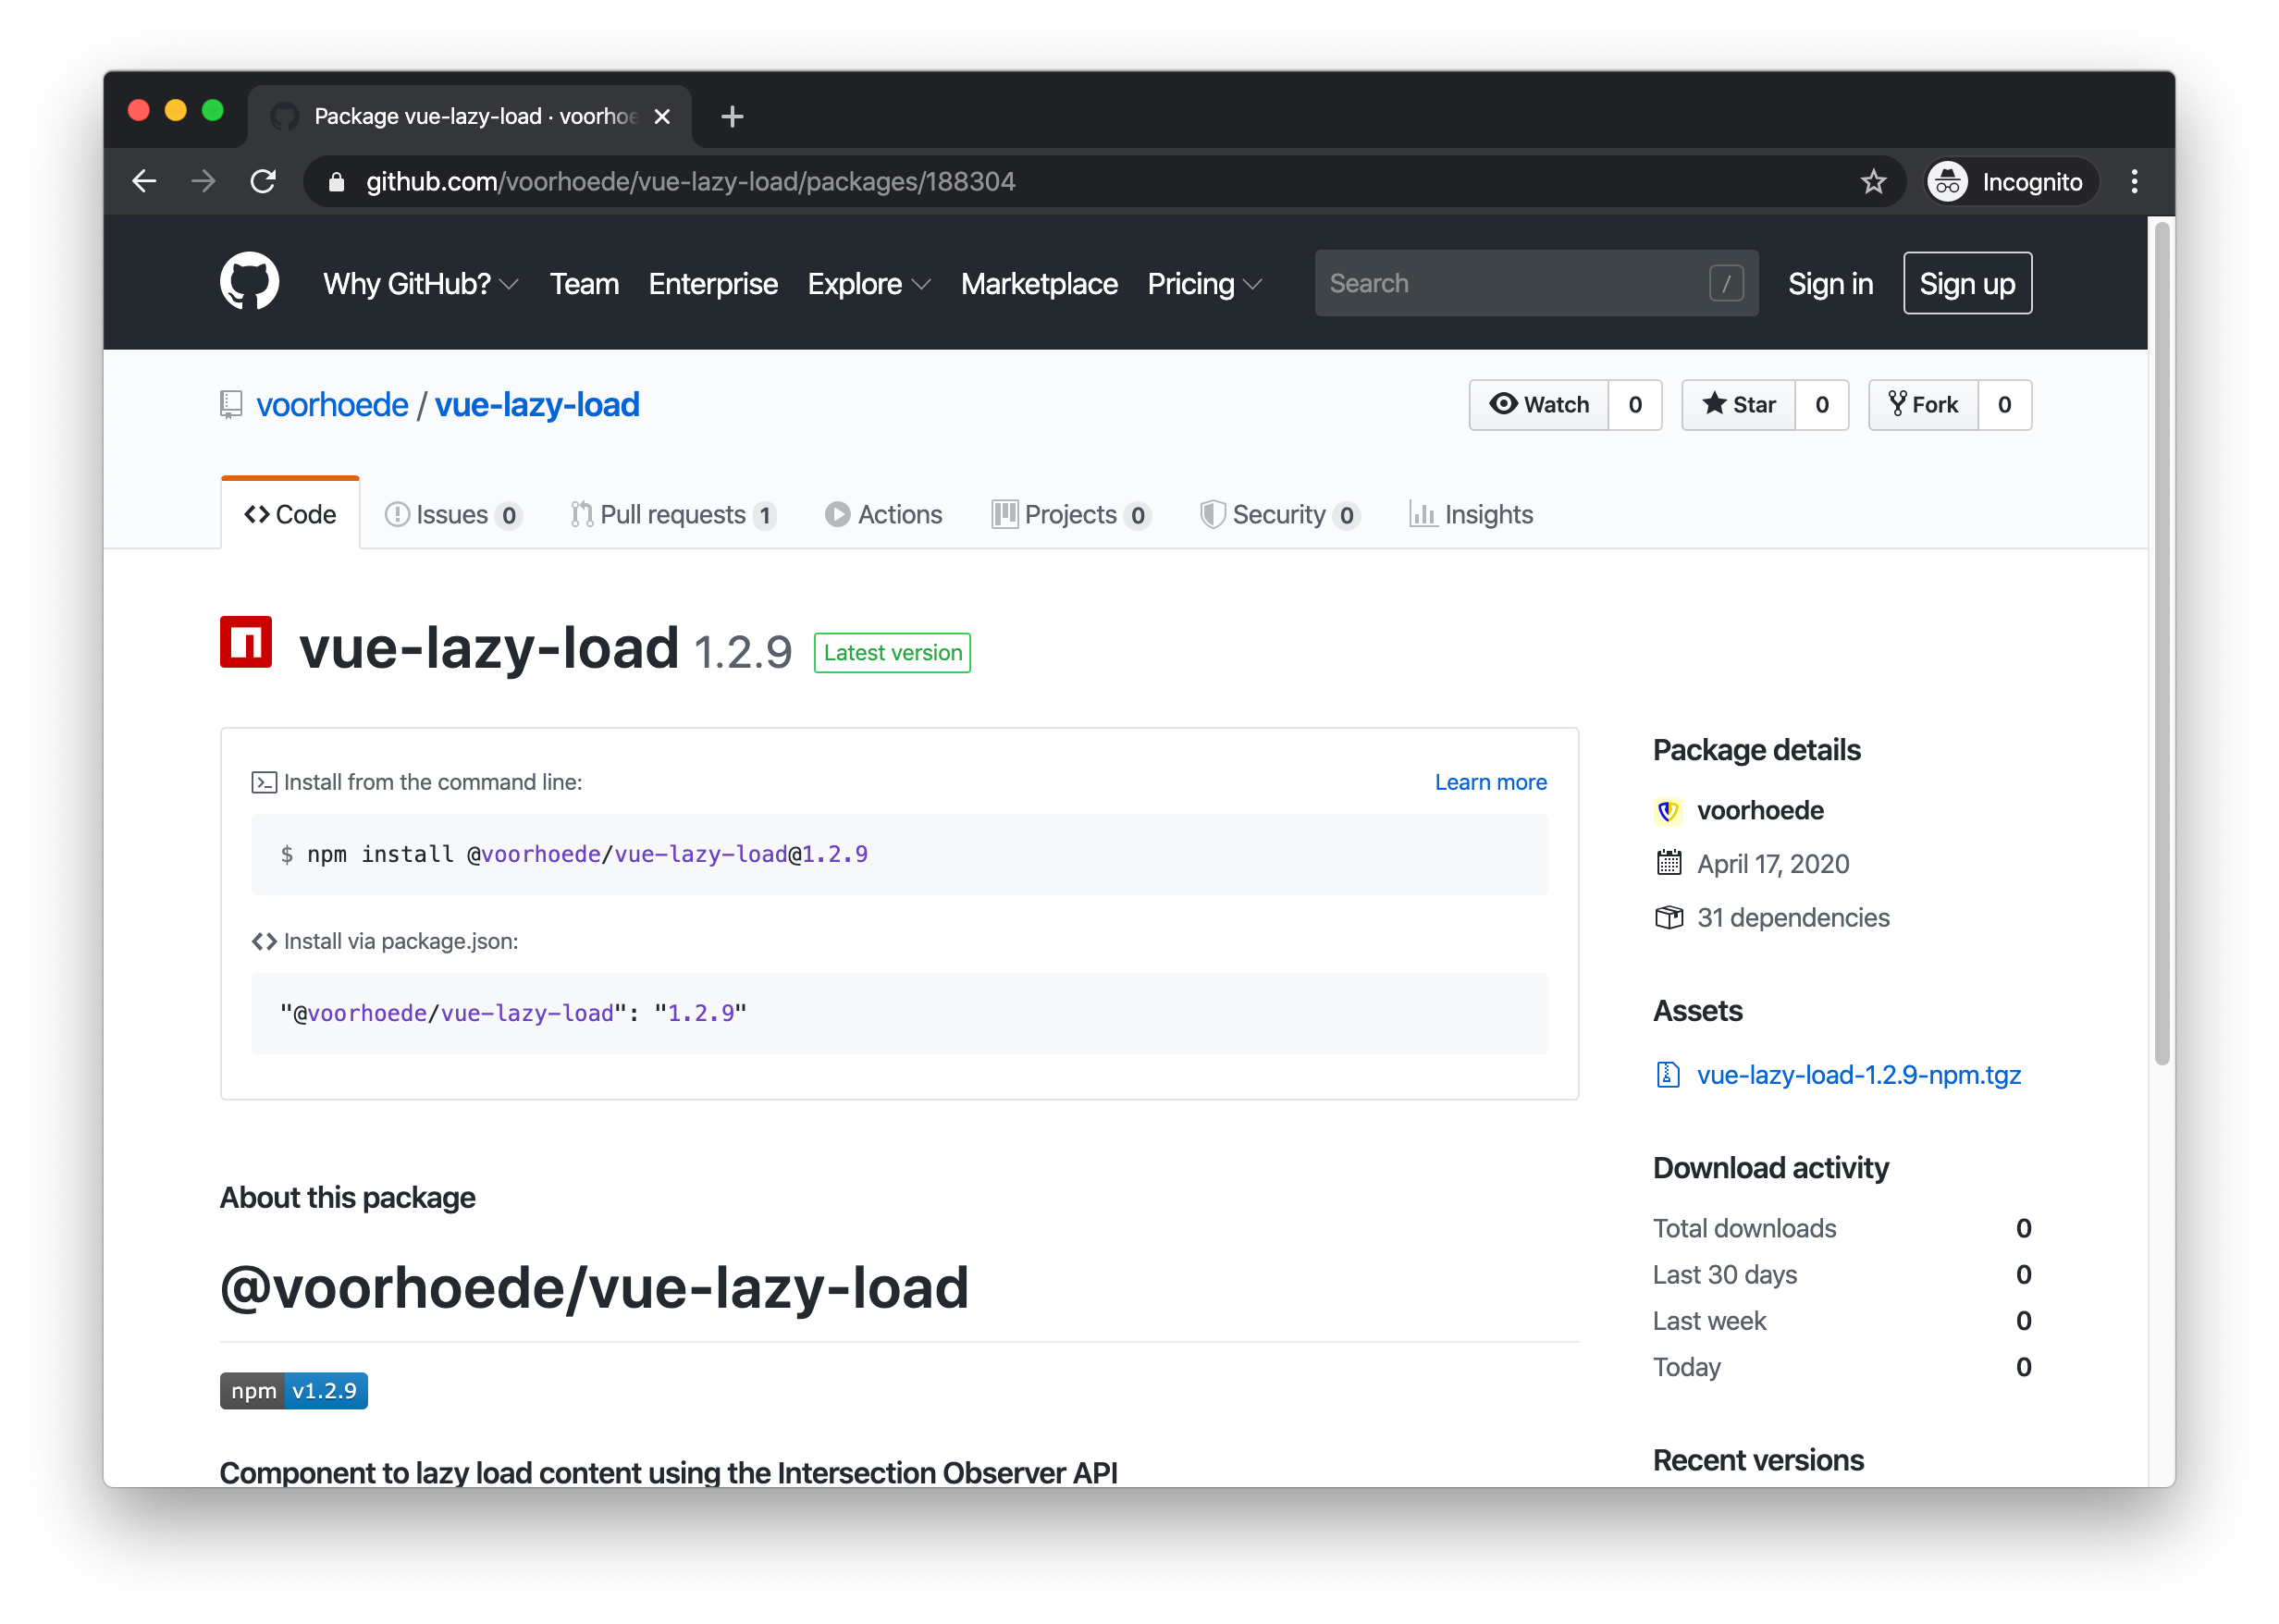
You now have an npm package with (partly) automated documentation and publishing to npm on every new tag! To see an example of how this is implemented in real-life, take a look at the repo of @voorhoede/vue-lazy-load. We have created a couple of components this way, those can be found on our open-source page. If you publish a Vue component yourself, please do share it with us!
Resources
More about Vue
- Highlights from Vue.js Nation 2023
- Looking for experienced Vue.js developers? We can help!