What would the modern web be without WebGL? We see it being used in more and more sectors, like 3D visualizations in games and VR, physics simulations, data simulations and artwork. Let’s delve deeper into this topic so that you don’t fall behind the future of web design.
What is WebGL?
WebGL could best be described as a JavaScript API for implementing interactive 2D and 3D vector graphics in the browser using the client’s graphics processing unit (GPU). It’s based on the OpenGL library that has been around since 2002. Some practical examples: the Google Maps 3D function and Unity’s game engine.
How to use WebGL: a step by step guide
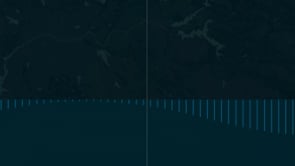
For our client Deltares we added an animation in the project about the Global Water Watch. The goal was not necessarily to help the user, but to make the website more visually appealing. While designing, we wanted to have a graphical or visual element that refers to water.
Also read: using Figma as a CMS.
How to start?
First things first. We constructed a wavy graphic in Adobe Illustrator and saved it as a .svg file. This svg file was imported into the design (a Figma file). That creates a nice overview for how the final design should look.
6 options for web animation
In order to make an animation out of an static design, we had multiple options:
- Take the already constructed .svg that was used in the design and animate it using an animation library, like animeJs.
- Use HTML elements, like spans and animate it using an animation library like animeJs.
- Use the native HTML canvas element to draw the lines and animate it using an animation library like animeJs.
- Use an abstraction of the native HTML canvas like PixiJs or p5Js.
- Use a WebGL library like threeJs.
- Write our own native WebGL implementation
We chose to write our own native WebGL implementation. Why? Using native WebGL wins over native Canvas because we can partly use GLSL code which is executed on the GPU. In comparison, all the options above require the CPU to do all the work (including native canvas). As the wavy graphic was fairly simple to build (it’s not even 3D, so no complicated calculations needed), we decided to build it in native WebGL. This meant having to write the smallest possible amount of JS, whilst getting the best possible performance when using shaders (written in GLSL).
How to bend WebGL to your will
While making wonderful animations, there could also be some struggles when using WebGL. Here’s how to tackle them:
- Drawing lines in WebGL is easy, but not very flexible. Not all browsers allow us to set the width of the line. So instead of lines you could opt for rectangles. That way you could define the width of each ‘line’ (1, 2 or whatever size in pixels).
- Drawing, let’s say, 100 rectangles requires 100 draw calls in WebGL, which is quite expensive for performance. A better option would be to use a method called instanced drawing. This comes down to having one source shape that is copied into different positions. This way we only have one draw call.
- Use the GPU to do all the heavy animation computation by using shaders (written in GLSL). Also, try to keep the CPU (JS) calculation at a minimum.
Our approach
- We started off by creating a Vue component that renders an amount of rectangles equally distributed horizontally to a canvas element.
- Then, we recalculated the amount of instances when the available space changes (resize of browser).
- Hereafter, we transformed each instance (scale on the y-axis) continuously to achieve the wave form.
- We used the perlin noise (a type of gradient noise used to increase the appearance of realism) to get the random wavy shape.
- Finally, there is the vertex shader code. This calculates the position and transformation for each rectangle individually.
import snoise from './snoise'

const vertexShader = `
  uniform float u_delta;
  uniform float u_spread;

  attribute vec4 a_vertex;
  attribute float a_offset;

  ${snoise}

  void main() {
    float noise = snoise( vec3(-u_delta, u_delta, 1.0) + vec3(a_offset, 0.0, 0.0) );
    vec4 noise_position = vec4(1.0, noise * u_spread, 1.0, 1.0);

    vec4 offset_position = vec4(a_offset * 2.0, 0.0, 0.0, 1.0);

    gl_Position = (a_vertex + offset_position) * noise_position;
  }
`

export default vertexShader
Check out the result of our animation on the website of Global Water Watch.